
3D Printing for Life Scientists
Published:
This is a short primer on getting started with 3D printing for the laboratory.
Sections
- Basic workflow (aka: I found something online I want to print)
- Advanced workflow (aka: I want to design my own stuff to print)
- FAQ
- Other Resources
Basic workflow
AKA I found something online I want to print
We currently have a Prusa Core One.
Here is its handbook, which I highly encourage you to read to get started.
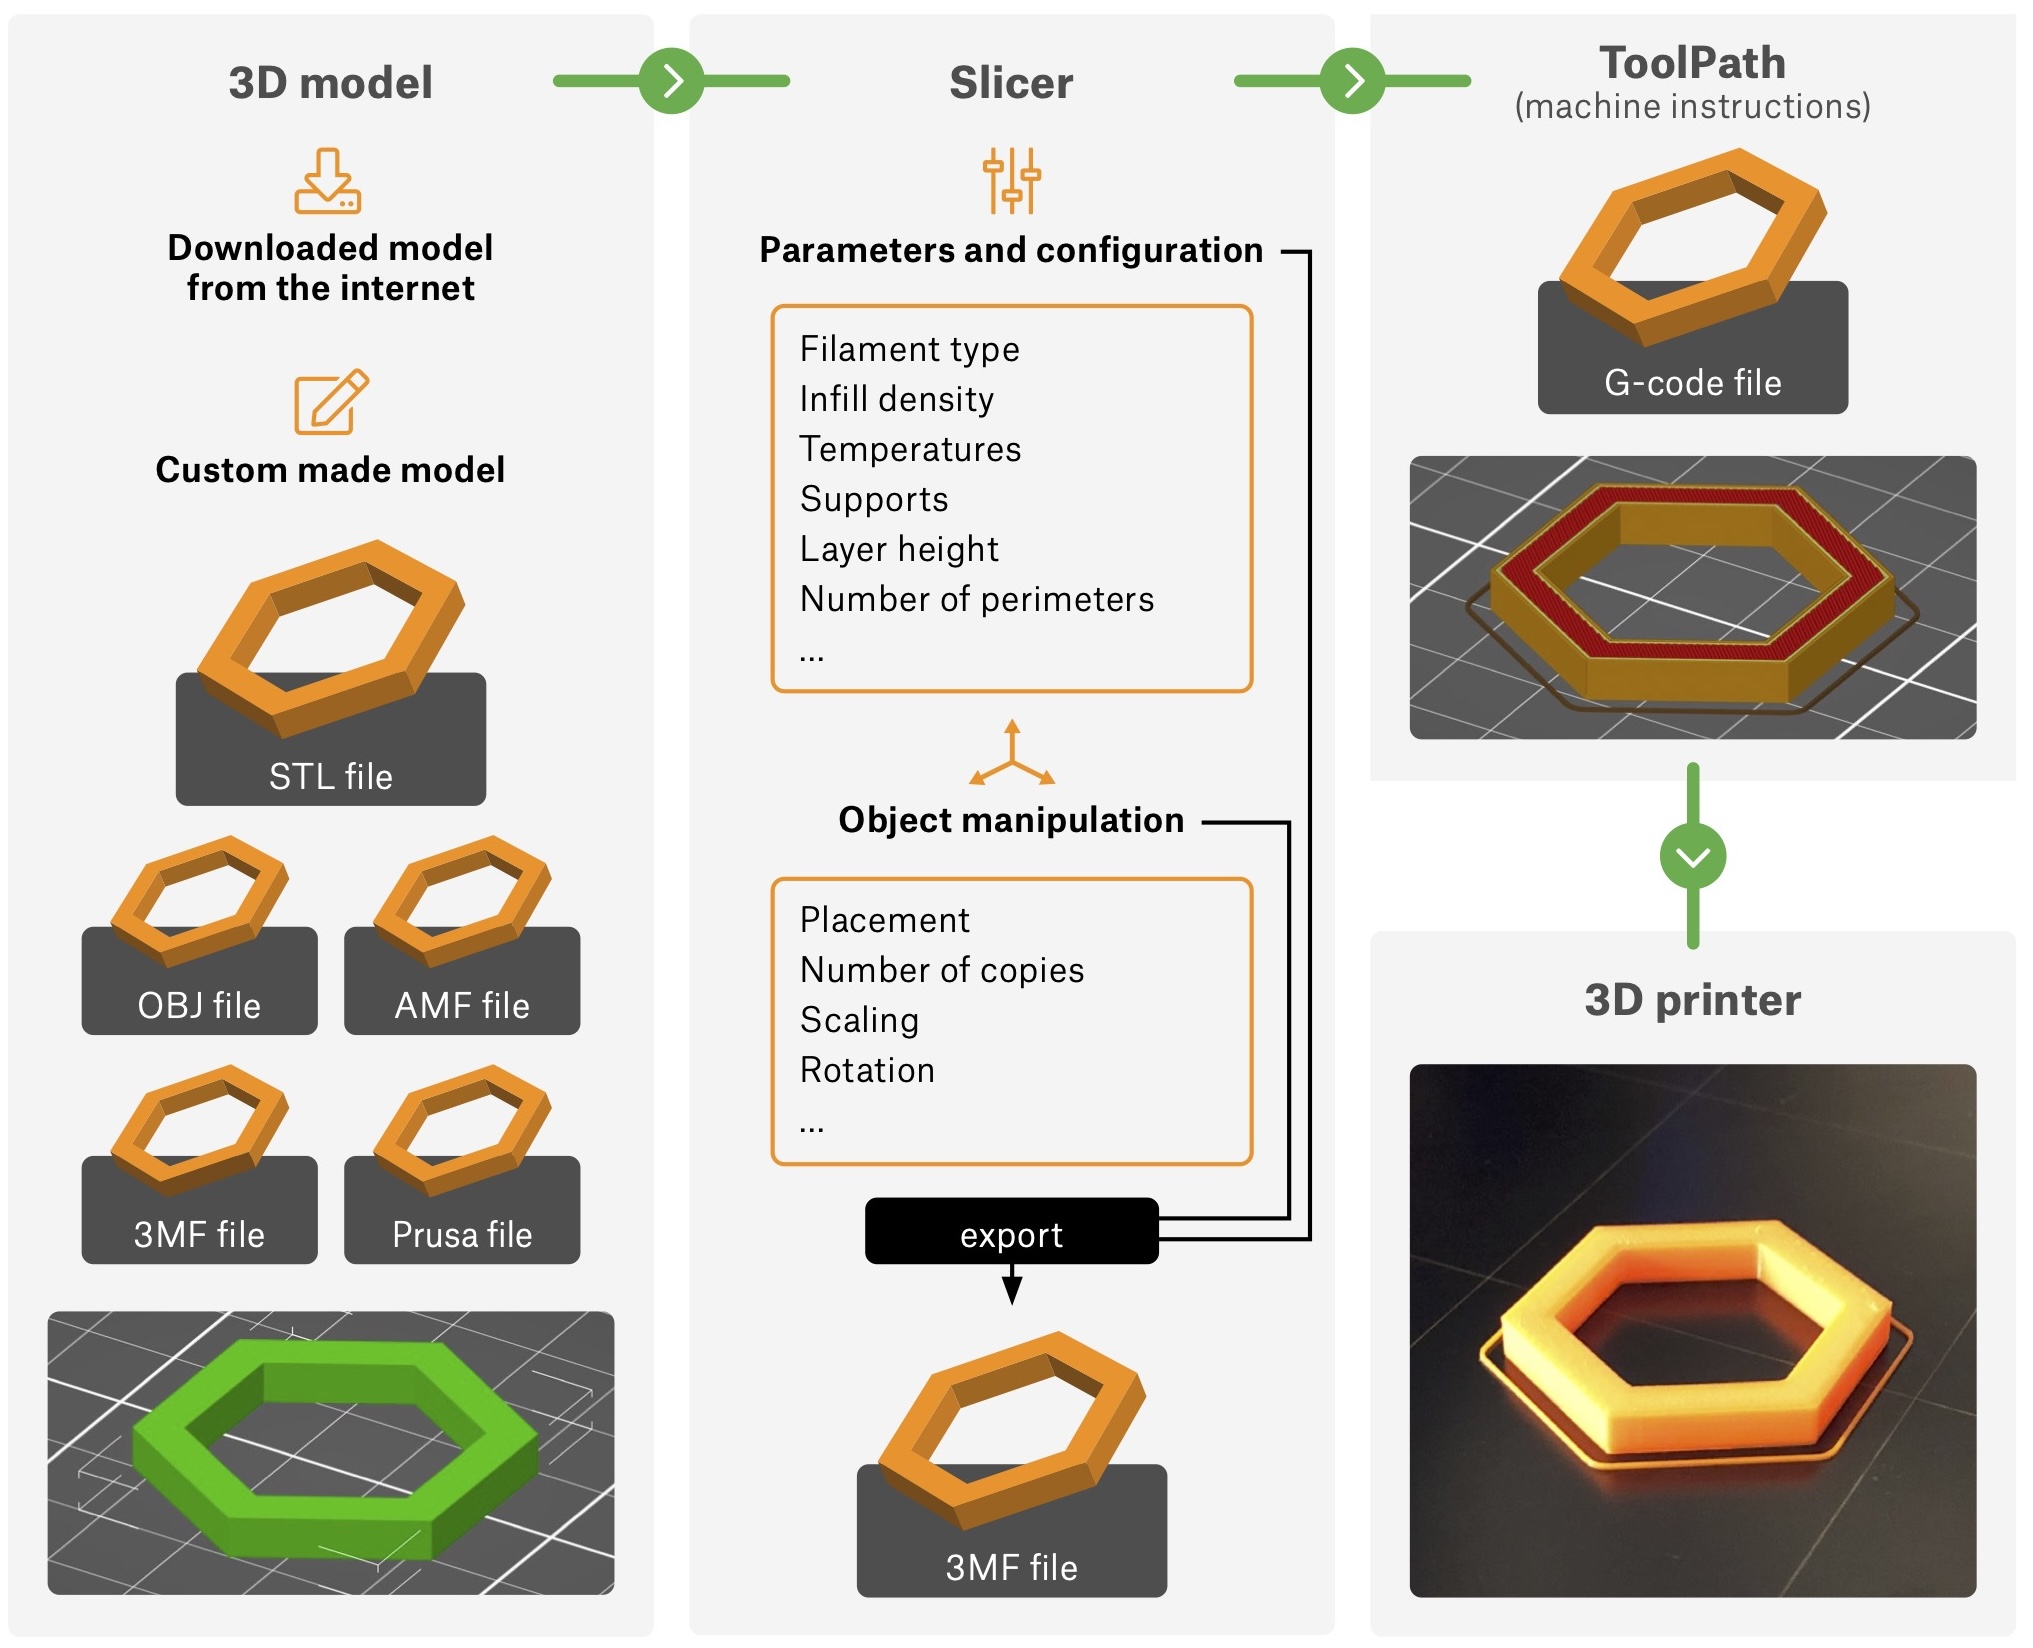
There are 3 main steps to 3D printing:
- Get a printable 3D model: Usually an STL or OBJ file, these are widely shared online
- Prepare the file for printing: Using a ‘slicer’ software package, prepare the model file for printing. The slicer exports a ‘G-code,’ which is a printer-specific set of instructions that include information about temperature, output speed, etc.
- Print it
1. Get a printable 3D model
2. Prepare the file for printing
Slicing is the process of turning a 3D object into a machine code called G-code using a software tool called a slicer. The input for the G-code generation is not just a 3D object, but various settings as well – like the toughness of the model, amount of details or printing speed. It’s also possible to modify the objects – scaling, rotating, cutting and other tools are available. Last, but not least – you can use slicers to position the object(s) on the virtual printing surface.
The most common slicer software:
Basic things to consider:
- Layer height/Level of detail/Resolution: Higher values = faster prints but more visible layers. PrusaSlicer has an “Adaptive layer height” option to change height based on geometry.
- Perimeters: How thick are the walls?
- Infill: How much of the interior is filled. Generally 10-20% is enough for most parts. Load-bearing parts should be made 50-70% infill. Rarely is 100% necessary.
- Supports: Scaffolding structures that support overhangs or parts that start mid-air. These are designed to be easy to remove but they may leave marks on the model. “Organic supports” mimic tree growth and result in faster printing and less waste
- Orientation: Since the model is printed layer by layer, if force is going to be applied to it, it will easily shear on those layer lines; recommend rotating the model 30-45 degrees for increased strength
- Adhesion to build plate:
- Brim: Additional flat surface to prevent object from warping/detaching mid-print
- Skirt: An outline around all the models on the print bed. Doesn’t help the model adhere but helps quickly verify that first layer is sticking properly
- Raft: A heavy-duty support structure to prevent warping/lifting from the print surface
Step by step instructions for PrusaSlicer (Beginner Mode specified in top right corner)
- Load model into PrusaSlicer
- Select Print settings (number indicates layer height, smaller number = more detailed)
- Select filament (if known, otherwise Generic PLA is fine)
- Printer: Prusa CORE One HF 0.4 Nozzle
- Supports: None (this assumes the model will sit well on the build plate, if not, the software may suggest adding supports)
- Infill: 15% is good for most applications
- Arrange/scale model on plate (or multiple models if you print a bunch of stuff at once)
- Click “Slice Now”
- Export G-Code to flash drive.
Printing the model
- Save the G-Code to a flash drive
- Turn on the printer (rear of machine)
- Check to see that the correct filament is loaded (If not, see Changing Filament in the handbook)
- Clean build plate (Use a kimiwipe + isopropyl alcohol)
- Plug in flash drive
- With gloves, remove build plate once cool and gently bend to pop off the model (may need to use plastic spatula to help remove model. DO NOT USE METAL OBJECTS ON BUILD PLATE!
- Clean up any extra plastic in printer
- Turn off machine
Advanced Workflow
AKA I want to design my own stuff to print
I am going to rely on you learning how to CAD on your own, but here are some software packages to get you started.
- Tinkercad: Super intuitive and easy to use. Free but registration is required. 90% of what I’ve needed to design I can at least get started on Tinkercad.
- FreeCAD: FOSS offline CAD software
- Autodesk Fusion: Paid
- Solidworks: Paid
- Blender: FOSS 3D rendering software
Things to consider when designing a model:
- Try to minimize the need for supports
- Decide how the model will be positioned on the printer - will shear forces be applied in any direction? Does a surface need to be smoother than others?
- Consider splitting a model into multiple parts if there are overhangs/low adhesion points (eg. a sphere printed as 2 halves and glued together will look better than printed all at once.
- Consider tolerances when modeling parts to fit together. There’s no universal rule, but generally a minimum of 0.15mm difference should be included.
- Circular holes printed vertically won’t be perfectly circular.
- Walls must be about 0.45mm at minimum (for this printer)
FAQ
What is 3D printing?
3D printing is an automated additive manufacturing process. There are numerous technologies for 3D printing, but for the purposes of this guide, we will ficus on the most commonly used one, called FFF (Fused Filament Fabrication) in which an object is created layer by layer by melting a strand of plastic.
What can we print?
Anything that can fit in the build volume (unless you want to break a model up into multiple pieces.
Can you print transparent objects?
Not with a FFF printer, you would want to use a resin printer (SLM) or laser cutter (available at UCLA Makerspace)
Are 3d-printed parts food-safe?
Technically yes, though I wouldn’t try it, unless they are coated in a food-safe epoxy.
Are 3d-printed parts autoclavable?
No, but they can be sprayed down with 70% EtOH.
What types of materials can we print?
The most frequently used filaments are PLA, PETG, and ASA.
PLA
Pros:
- It’s easy to print.
- No unpleasant odor during printing
- Low thermal expansion compared to other materials. It does not warp, and sticks to the printing platform nicely. This is why it’s suitable for printing large objects.
- PLA comes in a wide variety of colors.
- One of the cheaper materials
Cons:
- PLA is hard and brittle. It has a tendency to break and shatter under pressure.
- PLA is not temperature-resistant, it starts to soften at around 60 °C (140 °C), which makes it a less-than-ideal choice for printing things like car smartphone holder.
- Compared to the rest of popular materials, PLA has the worst weather resistance.
PETG & ASA
Pros:
- More flexible than PLA
- Shinier finish
- UV Stable, lower thermal expansion
Cons:
- Tend to bend and warp during printing
- Noticeable odor during printing
TPU/TPE
- Rubber-like flexibility